It’s exciting to get a new computer, but frustration can set in quickly due to language barriers.
If you know how to use your Chromebook’s settings, changing the language is a simple task.
Quick Steps: Chromebook Settings > Advanced > Language and Inputs
Here is everything you need to know to complete it quickly.
How to Change the Language on Your Chromebook
1. In the lower-right corner of your screen, select the time icon.
2. To access your settings menu, select the gear icon.
3. Scroll to the bottom of the page and click “Advanced.”
4. Under “Languages and Input,” select “Language.”
5. Either locate your language from the list, or if it isn’t listed, click “Add Language,” locate it from the list of languages, and click “Add.”
6. When a language’s three dots appear next to it, click one.
7. From the available options, pick the language usage you want to use.
- If you want to use that language for menus, then select “Show this language’s version of Chrome OS.” Then, in order for these changes to take effect, you must restart your computer and sign in once more.
- If you want to show web pages in your selected language, select “move to the top.” You may also be able to have Google auto-translate web pages by clicking “To translate this language’s pages, offer your services.”
Translating Web Pages in Your Language
However, your visit to a website won’t be translated if you skip this next step. All that will appear in your new language instead are your system interfaces and similar things. You can see that I’ve incorporated Japanese into my system in the examples I’m giving you today because that’s what I’m learning right now, but yours will be based on whatever you added in the previous step.
To fix this, just go back to the “Languages” section of the Settings app and you’ll see a “Website languages” area. Click the “+ Add languages” button, type in your language of choice, and select it. Then, be sure to tap the three dots “more” menu to the right of the newly added language, and choose “Move to the top” to rank it as the primary language that Websites will be translated into by Chrome.
1. Open the Settings app
2. Navigate to the “Languages and Inputs” section
3. Select “Languages”
4. Under “Website Languages”, tap “+ Add languages”
5. Type in the language you’d like to add
6. Tap the three dots menu to the right of the newly listed language
7. Select “Move to the top”
Important: Only alter this setting if you want all of your web pages to be translated into the new language on all of your devices. Chrome and this setting are synced!
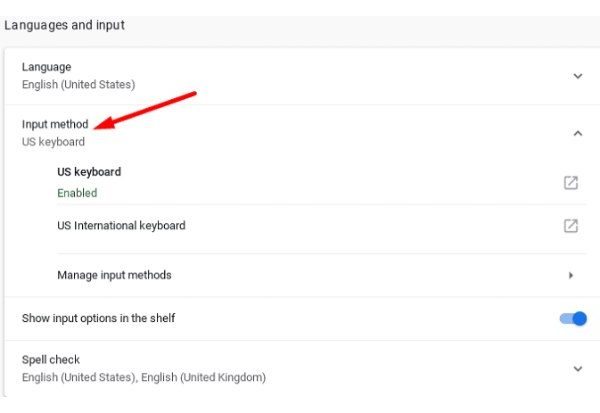
Changing Your Input Methods
Now that everything on your Chromebook and browser is correctly translated and producing the desired output, what about inputs? Naturally, you’ll want to use the keyboard on your Chromebook to type using your native language, so let’s do that next. In the same “Languages and Inputs” section of the Settings app, choose “Inputs and keyboards”, choose “+ Add input methods”, search for the same language, and select it.
Remember that there are numerous input methods you can add here. In the case I’m using today, I’ll want not only Japanese, but also the “Alphanumeric with Japanese keyboard”, and the “Japanese with US keyboard” so I have more options.
1. Open the Settings app
2. Navigate to the “Languages and inputs” section
3. Choose “Inputs and keyboards”
4. Click “+ Add input methods”
5. Type in and select your new language
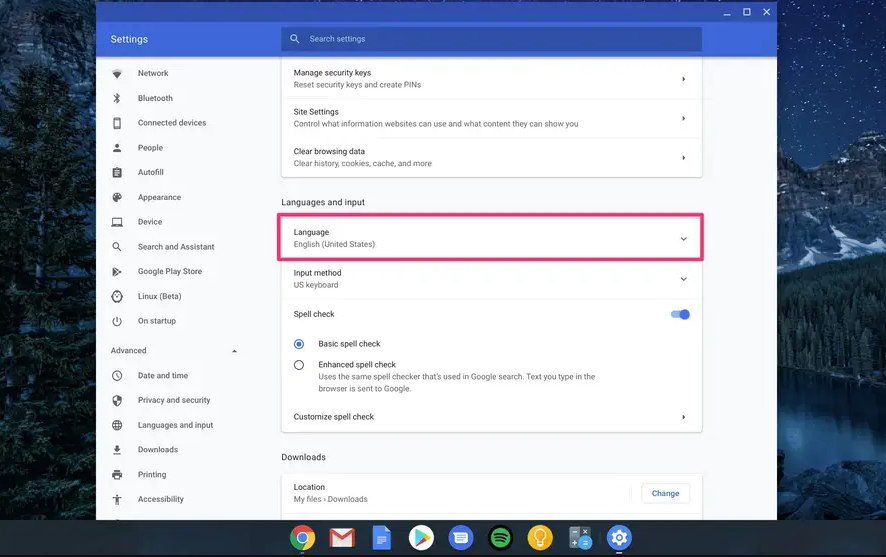
Changing Your Account Language
You can also change your language globally in your Google Account settings. In the same “Languages and Inputs” section of the Settings app, go to “Languages”, and scroll down to “Google Account language”. To go to your Google Account online from here, click the square with an arrow icon as shown below.
A site’s language will not be affected if you manually change one of its language settings; however, changing your account language will actually take effect across all services, including Gmail, Drive, and Youtube. By going to the language page for your Google Account, you can also access this setting directly online.
1. Open the Settings app
2. Navigate to the “Languages and inputs” section
3. Click “Languages”
4. Scroll down to “Manage Google Account language”, and click it
5. Select “+ Add another language”
6. Type in and select your new language
7. Click the up arrow to make it your preferred language
Quickly Swapping Between Languages
The final step is to show you how to quickly switch between input languages on your Chromebook without having to open the Settings app repeatedly. You can either be sure to choose “Show input options in the shelf” in the “Inputs and Keyboards” section of the For effortless switching between them, use the Settings app or the keyboard shortcut listed below. In addition to your input methods, you’ll also see voice, emoji, and handwriting input by tapping the “Input methods” icon on your shelf.
1. Open the Settings app
2. Navigate to the “Languages and inputs” section
3. Click “Inputs and keyboards”
4. Toggle “Show input options in the shelf”
5. Click the newly added input options button at the bottom-right of your Chromebook shelf
6. Select new input method or use keyboard shortcut
Okay, you’ve successfully changed the language of your system, input methods, and perhaps even your Google Account. We wanted to create a thorough guide for all Chromebook users of any skill level, so even though this was a little longer for something that many people might find fairly simple, we felt it was important. As you and your friends or family members acquire their first Chromebook, we hope that this will become a go-to resource for you.
Conclusion
Your Chromebook can be changed to your language for convenience if you prefer to change the language. Follow the instructions above to change your Chromebook’s language if you want to make a different language the default.
FAQs
How to Change Language on Chromebook Shortcut
You can also switch your language by pressing Ctrl + Shift + Space until the language you want is selected. Ctrl + Space will switch back.
How to Change Language on Chromebook Keyboard
- Choose the time in the bottom right.
- Select Settings .
- Choose Advanced from the left panel.
- Under “Languages and inputs,” select Inputs.
- Under “Input methods,” select Add input methods.
- Your choice of keyboard languages has been made.
- “Enabled” is listed under the current keyboard.